French giant OVH is, at least at the moment of writing these lines, the largest dedicated server provider worldwide. So it only makes sense that we want our system of choice to work out of the box with their dedicated server line, named by the marketing guys as Bare Metal to difference it from their offerings in the vaporous and comfy realm of the cloud.
Unfortunately, OVH does not provide an automated FreeBSD installation anymore as they used to for a long time, but nothing stops us from installing it ourselves. It just means we won’t get any support from them regarding this setup, which is no big deal anyhow as they were not particularly enthusiastic about it in the first place.
As for us, it gives us a chance to get a bit more intimate with the illustrious offspring of the Berkeley Software Distribution. The first step in our journey is to visit the FreeBSD Project website and find out what’s the flavour of the day: at the moment of writing this article, 12.3, and 13.1 were the only supported releases, but these instructions should work whenever you are reading this, for FreeBSD has the advantage of delivering a very consistent experience across versions. I opt for 12.3 and scroll down the release announcement until I find a Download link.
https://download.freebsd.org/ftp/releases/ISO-IMAGES/12.3/
From all the files available here, I opt to download the file name FreeBSD-12.3-RELEASE-amd64-disc1.iso, which is a CD image, and save it to my PC.
Booting the installation CD
In the OVH customer panel we will open the Bare Metal menu and select the server where we want to perform the installation from the Dedicated Servers menu on the left.
In the first tab of the server page, just make sure the boot option is set to hard disk (rather than rescue) and then proceed to the IPMI tab. Here you will find the KVM option. KVM is the acronym of Keyboard Video Mouse and allows us to use our server as if we were sitting in front of the machine. Press “Start a KVM session in the browser”. If you don’t have this button, you will likely have to download a java applet instead. The procedure is similar in both.
After some 30 seconds a new button should appear, “Access a KVM session on your browser”. After clicking on it we will find ourselves in front of a console screen. Press the button in the top right, “Select Media”, and choose the FreeBSD iso file we downloaded earlier. Finally, open the Power Options drop down menu and Reset the machine. (Java applet users will have to find the ISO option in the menus and then reboot the machine by using the option provided in the OVH website under the General tab)
After a couple of minutes, the machine should start booting. If everything is correct, we will see a kilobyte counter slowly increase in the top right corner of the page, which means the console is streaming the iso file from our PC (if it’s too slow, gets stuck or refuses to boot, try disabling ad and popup blockers in your browser). Java applet users will just have to wait as no counter is provided.
Either way, FreeBSD should eventually boot and a a dialog will show up asking what we want to do with the CD. We will choose “Install”.
Fiddling with the BIOS
If the CD booted and you made it to the FreeBSD logo, skip this section. If the CD didn’t boot and we are stuck in some unknown screen, we will have to reboot and enter the BIOS. This is usually done pressing the DEL key, but you can find out by paying attention to the text on screen during the early boot stage.
Once inside the BIOS we will have to find the option to modify the UEFI Boot Order and then place the desired boot device (in our case VIRTUAL CDROM or something along these lines) first on the list. I will not give more detailed instructions as this procedure is slightly different in each system. In any case, remember you can reboot from the website if you are using the java applet and you can’t find such option.
Installation options
Many options in the Installer can be simply left as default or, if we know what they mean, changed to suit our personal preference, so I will not describe them. There are two exceptions that I will detail below.
Filesystem
When prompted to choose a filesystem, we will select ZFS. In the ZFS Configuration screen we will use our arrow and enter keys to change the Pool/Type of Disks setting from stripe to mirror. I am assuming here that your setup is a typical one with two identical disks.
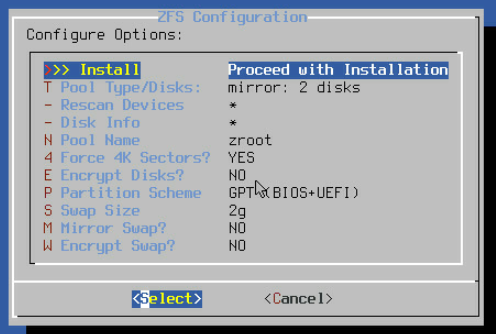
Explanation: this creates a RAID type setup where both disks are mirrored, that is, one is a copy of the other. This means that if one of the disk breaks, you will not lose your data but you can continue working normally – eventually getting the faulty drive replaced by OVH support. This comes at the cost of half the capacity of your drive but believe me, it’s worth it – unless you’re in a business where storage space has priority over uptime of course.
Update: it’s also advisable to choose GPT(UEFI) as partition scheme as otherwise the system could fail to boot in some BIOS models.
Once the mirror option is selected, press arrow up and then enter to Proceed with installation. You will now be prompted to choose the specific drives to use for our mirror. Usually these will be called nvd0 and nvd1. Use the space bar to select them and then move the cursor to the bottom and press enter to proceed.

Distribution
Under Distribution Select you may want to choose lib32 if you need compatibility with 32 bit software. The rest is usually not important if you don’t know what it is.
Default services
When prompted to choose the default services to install, I recommend choosing local_unbound (caching DNS resolver – more on this later), sshd (the much necessary SSH daemon) and ntpdate (a service that checks and correct our server’s date and time at boot).
Network
When asked if we want to set up IPv4 and IPv6 at this time, we will choose YES and then let it set up automatically. At the Name server screen type . in the Search field and then Proceed. If automatic network setup doesn’t work for some reason, choose NO and follow the instructions below. If it does, just skip to the next section.
Manual network setup
Once the installation is finished, we are offered the option to make manual modifications in the shell before rebooting. Here’s where we get the chance to set up the network manually. To this end, we will edit the following files. Replace <interface> with your actual interface name, which you can read with the ifconfig command. The primary and gateway IP can be found in the General tab of your server’s control panel in OVH (Bare Metal Cloud > Dedicated Servers > this server).
/etc/rc.conf
ifconfig_<interface>="inet <PRIMARY IP> netmask 255.255.255.255 broadcast <PRIMARY IP>"
static_routes="gw1 gw2"
route_gw1="<gateway ip>/32 -iface <interface>"
route_gw2="default <GATEWAY IP>"
/etc/resolv.conf
nameserver 213.186.33.99If you wonder what this IP address is, it’s the OVH DNS server. And in case you wanted to be clever and use Cloudflare (1.1.1.1) or Google’s (8.8.8.8) instead, you should be aware that OVH will route these addresses to their own DNS anyway.
Once this last change is saved and we’ve left the editor, type exit and enter to leave the shell and reboot.
Ready to rumble
Once the system is rebooted, all that’s left to do is to allow the root user* to connect through SSH so we can continue our setup tasks in a more friendly environment such as Termius or Putty.
Edit /etc/ssh/sshd_config and find this line:
#PermitRootLogin no
change it into
PermitRootLogin yes
Save and exit the text editor and restart the ssh daemon for the changes to take effect:
service sshd restart
(*) This is of course not a secure setup and should be just a temporary solution allowing us to do the rest of the setup in a more comfortable environment than the KVM console. Once you are finished here, I recommend to set up SSH key authentication using the tutorial I have prepared to this effect.
Leave a Reply